This is part of Nourish’s Yoga Practise Guide Library. We were inspired to make these guides to support your own yoga practise and as a resource for teachers who want to make their classes more accessible. We were also pretty tired of all the generic teaching instructions and guides floating around the internet that aren’t inclusive, accessible or adaptable in any way.
If you would like more guidance on making this practice accessible, we have missed something, or you have any questions drop us a comment –– we love hearing from you and really do mean it when we say yoga is for everybody!
Jump to:
What is Chair Yoga?
Chair yoga is yoga that is practiced primarily whilst seated in a chair, and is widely recognised for its accessibility. Traditional yoga asana, such as sun salutations, standing, seated and reclined poses, can all be adapted for chair yoga. It is also excellent for joint mobility work and a gentle way to improve overall physical posture.
Chair yoga was originally popularised for older people, people who experience limited mobility, are physically disabled, and neurodiverse populations who benefit from the support, movements and sequencing unique to chair yoga. However, it has grown increasingly popular recently as a counterbalance to deskbound lifestyles.
If you are interested in Chair Yoga trainings, both our 300-hour program and 200-hour program include Chair and Accessible yoga modules. Modules on our 300-hour program can be taken as stand-alone workshops, so keep an eye our calendar for the next Teaching Inclusive Asana module.
The Evolution of Chair Yoga
It’s never easy to get to the root of yoga styles and asana, but the term Chair Yoga was likely coined by Lakshmi Voelker-Binder in the US in the 1980s. She began developing chair sequences and poses for students with limited mobility and for whom floor-based yoga asana were no longer possible. However, its origins most probably lie with yoga practitioner B. K. S. Iyengar. Iyengar yoga is famed for its use of props, including chairs and stools, to deepen and develop asana. More recently, chair yoga has been integrated into and evolved to become a key aspect of Accessible Yoga, with Jivana Heyman being the most influential practitioner in this realm.
Chair yoga refers to a seated and accessible style of yoga, however, it is sometimes used to describe asana where a chair is incorporated, such as is the case with Iyengar yoga. These distinctions are important, as not as all yoga with a chair is accessible. You can invert, backbend and arm balance on chairs too!
This blog is dedicated to accessible and seated chair yoga poses and sequencing.
Chair Yoga Instructions
These instructions are suggestions, feel free to adapt and modify as needed! As always, the poses should be adjusted to serve your unique body and circumstances, not the other way round.
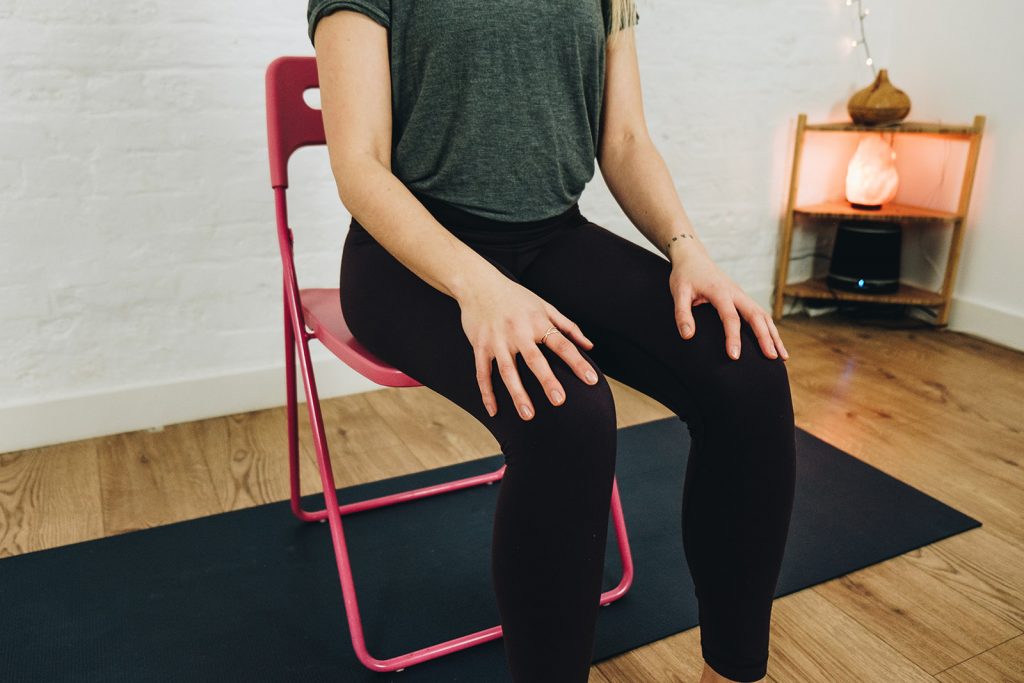
The Basics: Setting Up Your Chair
This set up is your chair Tadasana. Similar to standing Tadasana, it not only provides you with a home base but is great for establishing improved posture.
Sit in your chosen chair –– any chair will do. If you have a choice between a firm chair (like a kitchen chair) or a squishy armchair, go with the firm one.
If you are leaning against the backrest shuffle forward so there is at least two inches between your back and the backrest, lengthen your spine as much as is comfortably possible. The shoulders soften down the back, the neck is long.
Rest your hands palms up or palms down on your lap.
Take the feet a comfortable width apart, approximately hip-width or wider, and plant the soles of the feet firmly on the floor. If you have shorter legs, you might need to sit further forward on your chair, so your feet can fully connect to the floor.
Check your ankles are stacked beneath your knees. Imagine if you were to draw a line down the front of your legs, starting at the hips and ending at the feet, your hip joints, knees and ankles would be in the same plane.
Find your neutral foot position: for some people this is toes pointing directly forward, but if your feet naturally turn out or in, then your neutral position may also need to be turned out/in. The overall feeling we are inviting is one of comfort and stability, where the joints all correspond comfortably to each other, without straining or pinching.
Adding Props To Your Chair Set up
Props help you fine-tune your chair posture –– they are great to use if available but don’t worry if not.
Props you can use: blankets, cushions, blocks (the wider flatter variety), bricks (the taller thinner variety), books, bolsters, straps or scarves.
Adjusting for Back Issues
Slide a cushion between your back and the backrest of the chair, this still encourages a lengthened spine but provides some extra support without slumping or leaning back.
Adjusting for leg length
The intention is to create a 90-degree angle at the back of the knees, with your buttocks and thighs being in a straight horizontal line, and then knees to the ankles being in a straight vertical line. However, depending on the height of your chair, if you have longer legs you may find your thighs slope up (<90-degrees), and if you have shorter legs your thighs may slope down (>90-degrees) in order for your feet to be flat on the ground.
For longer legs: It might be most comfortable to raise your seat to bring your pelvis and knees into the same plane. To do this, sit up on some folded blankets or cushions (these are more stable and mould to the seat better than yoga blocks).
For shorter legs: It might be most comfortable to raise the floor up, so you can find that 90-degree angle with feet firmly planted. Placing your feet on blocks or books creates a broad and stable foundation (try and get books that are the same size, big coffee table books work well). If you have an oblong-shaped bolster you can also use that.
You can also add in props if you like the sound of them, just try and build up your seat and the floor by roughly the same amount to keep the 90-degree angle of the legs.
Other props
- Straps or scarves are great for seated hamstring stretches
- Extra cushions, blankets and bolsters are great if you want to do a seated Savasana. For Savasana, lean back in your chair perhaps against a cushion. Place a blanket around your neck and shoulders, like a chunky scarf, to create a neck support and lean your head back. Extend the legs forward and place a bolster just behind your ankles to provide cushioning.
Practising and Sequencing Chair Yoga
All you need for chair yoga is a chair, which is great as no specialist equipment or investment in a yoga mat is required! Chair yoga is also great if you have space restrictions as chairs take up a lot less room than a mat.
Chair Yoga Sequencing Tips
As with any yoga sequence, it helps to have a theme or focus to build your class around. Pick an area of the body and choose poses that mobilise and engage that area. As chair yoga can be very rhythmic and grounding, syncing the breath with gentle, repeated movements works well.
It is possible to adapt many traditional yoga asanas for chair yoga –– it just involves a little creativity. But keep in mind, it is more important that the pose remains accessible than it directly resembles the mat-based variation of the pose.
A chair yoga sequence tends to be shorter than a mat class. Half-an-hour is ample, and anything longer than 45 minutes can start to drag. If you are interested in developing your own chair practice, just five minutes a day could be enough for you.
Depending on your students’ requirements, it is nice to integrate seated chair asana with asana that use the chair as a support in standing or seated poses.
Poses and Sequence Ideas for Chair Yoga
– sun salutation variations
– non-weight bearing arm strengthening
– shoulder, chest and back openers
– forward folds and hamstring stretches, with and without straps
– side stretches
– joint mobility work (ankle, hip, wrist, shoulder and neck circles)
How Do I Adapt Chair Yoga To Make it Accessible? What Are Some Common Difficulties?
Chair yoga is in its nature designed to be accessible, however there are some important considerations to bear in mind:
- Even though the support of the chair makes many poses more accessible, consider how different pose variations make a movement more or less intense. For example, forward fold variations can include folding the torso over the thighs, or resting your forearms on your thighs and leaning forward, or folding over a bolster on your lap.
- Be mindful about chair yoga poses you discover online: much of what is currently circulating demands high levels of flexibility and mobility. For example, practising Warrior poses over the seat of a chair requires very open hips. Consider whether these variations are appropriate for you or your students before teaching or practising them.
- If you are an able-bodied teacher, when you develop your sequence consider the restrictions you are likely to encounter in your students. These may be physical, but if you are teaching neurodivergent students then consider how you phrase and demonstrate asana.
- As with any class, give you students the option to rest, sit out or modify poses.
- Keep your classes short.
How Do I Teach Chair Yoga To A Mixed Ability Class?
- Consider who your chair yoga students are (and ask them what they want!). Generally, students will have restricted mobility or they prefer the softer, mindful nature of chair yoga. Therefore, prioritise accessibility above all else, even if you have students in attendance who have no restrictions. Check in with your students to ask them what they need and what they’re interested in exploring together.
- Set your students up. Take a few minutes to explain the principles of chair Tadasana at the start of class. Students may need to adapt by leaning back or with different alignment which is all good –– there are many benefits to chair yoga.
- Make sure everybody can see you. A semi-circle set-up works well if you are teaching in person.
- Have pose variations prepared. Thinking about variations in advance also makes it easier to come up with alternative options on the fly.
- Return and build on repeated sequences and poses, this gives students the choice to stay at a variation of a pose previously explored.
- Emphasise what works better on a chair than a mat. For example, gentle rhythmic movements that could be coordianted with the breath or closing your eyes during asana are much less complex (and more enjoyable for many students) with the support of a chair.
- Mix seated and standing asana. If it’s appropriate for your students you can integrate some asana that use the chair as a support. One effective way to do this is to teach a seated variation of the sequence first (such as, triangle pose, warrior 2, and tree pose), then give students the option to try a standing version. This creates more alternatives for students who want to explore supported standing postures, whilst giving others the option to stay seated.
Pin for later
