
This is part of Nourish’s Yoga Practise Guide Library. We were inspired to make these guides to support your own yoga practise and as a resource for teachers who want to make their classes more accessible. We were also pretty tired of all the generic teaching instructions and guides floating around the internet that aren’t inclusive, accessible or adaptable in any way.
If you would like more guidance on making this practice accessible, we have missed something, or you have any questions drop us a comment –– we love hearing from you and really do mean it when we say yoga is for everybody!
If you’re curious and want to dive right in, skip to the end of the post where we share a recording of Harriet leading a loving-kindness meditation for you to try.
What is Plank Pose?
Plank pose has become ubiquitous across multiple movement disciplines as a great strength builder. It is celebrated as a pose that engages all the major muscle groups of the body, and when it comes to yoga — which spends more time on hands than many other styles of movement (downward dog, tabletop position, hand balances, etc.) — it is a primary movement for transitions, learning strong muscle engagement, and building physical stability in other poses.
However, also when it comes to yoga, plank pose is rarely given the time and attention it requires. The fundamental dynamics of plank usually aren’t taught, and it is often assumed to be part of a student’s movement repertoire. Given that it shows up repeatedly in flowing sequences (‘step or jump back to plank position, lower through chaturanga’, ‘come through plank’), and is foundational for establishing the co-ordinated muscle engagement required to keep the body safe in many complex poses, skimming over plank is not only a missed opportunity but can also result in some of yoga’s most common injuries — shoulder and wrist irritation, and a painful lower back.
When you say plank pose in a yoga context, people often think automatically of high plank. However, in this guide, we emphasise the key dynamics of the pose and embodied alignment of the pose, which can be recreated in multiple positions that are all variations on plank pose.
The Key Dynamics of Plank Pose
- Create a strong foundation that allows for even weight distribution throughout the body by pushing firmly through the hands, toes, and engaging the core, glutes and quads.
- Support the joints of the shoulders, elbows, and wrists by properly engaging through the hands and keeping the elbows soft.
- Protect the lower back and help alleviate stress on the joints by strongly engaging the core by both contracting through the pelvic floor muscles and engaging the transverse abdominals.
Is Plank Pose Essential For Yoga?
No. No pose is essential for yoga. Although plank repeatedly occurs in dynamic styles of yoga, there are multiple variations you can explore that may be more welcome for your body that safely help to build strength. If you are drawn to dynamic styles of yoga but don’t get on well with plank it is possible to practice Power or Vinyasa flow and never do a plank pose! Even if you are a fan of plank pose it is often overused in dynamic sequencing (as is the entire vinyasa sequence), and if repeated multiple times at high speed it can lead to fatigue, strain, and unwanted physical imbalances.
Plank Pose Suggestions and Variations
If you have the time, give all these variations a go — even if you are confident in your planks. You may be surprised about what you learn about your body in the different variations. If you are short on time, read through the Embodied Dynamics of Plank Pose section before trying your chosen variation. As well as multiple plank variations, there are also lots of tweaks you can explore that may work better for your body. There is no one size fits all approach, and if one of the recommendations below doesn’t work for you, please disregard it.
Learn the Embodied Dynamics of Plank Pose: Plank at the Wall
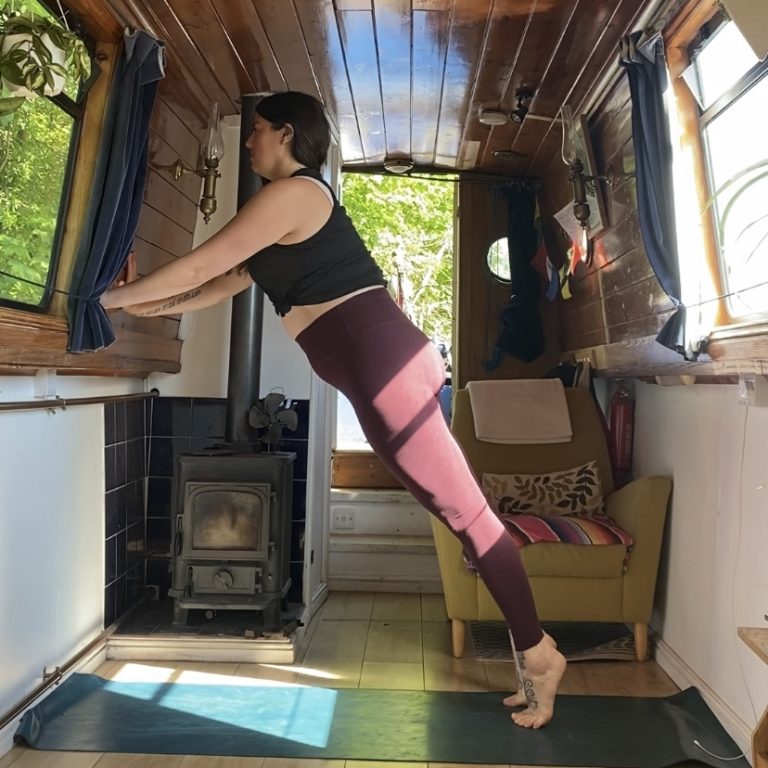
A helpful way to safely explore the dynamics of the pose is by practising at the wall. The wall variation is accessible for people with mobility restrictions and a safer way to build the necessary strength and muscle control for a floor variation. When working in standing with the support of a wall the load of the pose is reduced, which means the muscles don’t need to work as hard as they are not bearing the full weight of the body. It’s a great place to refine any aspects of the pose you are unsure about.
- Stand in Tadasana facing a wall, with the feet hip-width apart. Adjust your distance from the wall so you can extend your arms whilst keeping a soft bend in the elbows, and press your palms flat into the wall.
- Adjust your hands so the palms are underneath the shoulder joint and the fingers are spread wide, fingertips pointing upwards. Find a comfortable position for your chest and shoulder blades by adjusting how wide you take your hands — a couple of cm wider than the shoulders may feel more stable. You can also turn the hands out a little so the fingertips point diagonally outwards to create more space in the chest.
- Without actually moving your hands, traction your hands inwards—it’s the same dynamic as if you are unscrewing the lid from a jar. This helps to engage key muscles around the shoulders and chest, creating stability and openness. You may even be able to feel the awakening or firming of the muscles in this area.
- Adjust your head so your neck is comfortable. This may be looking straightforward or slightly tucking the chin to create more length at the back of the neck.
- Push firmly through your hands and notice if the shoulder blades press more firmly into the back. If your elbows lockout as you do this, try again focusing on engaging the muscles at the backs of your arms (triceps). You may need to adjust the width of your hands multiple times before you find a position that balances spaciousness with supported muscle engagement.
- The engagement of the pelvic floor muscle and transverse abdominals naturally support each other. To engage the pelvic floor muscles, become aware of the muscles beneath your navel that extend to the tops of your thighs, and then draw these muscles of your pelvic floor upwards. Support this upward contraction by engaging the muscles of the abdominals, from the top of the pelvis to beneath the ribs, in a wrapping motion. The abdomen will feel firm and the lower back spacious, check you can breathe freely. If your breath feels shortened, you may be sucking the belly in. Spend some time finding a gentler lift through the pelvic floor and softer wrap of the transverse muscles. You can practice this in Tadasana. A strongly engaged core is integral for high plank pose, so spend some time exploring your core engagement at the wall and in tabletop before moving on.
- Find a position for your spine that feels stable for your lower back and supports a strong core engagement. For some people, this may be in what is often termed a ‘neutral’ spine; in this instance, the back of your torso will be in a gentle sloping position. Other people may prefer to tuck the tailbone under, flattening out the spinal curves, so your shoulders and hips are roughly in the same plane. Both are fine — focus on how supported your core feels, as opposed to what you look like.
- Explore walking your feet backwards so you are on your tiptoes. You will need to keep adjusting the hands down the wall as you do this. Adjust the width of your feet until you feel more supported in the lower body. Notice how the quads lift and fire. Push outwards through your heels (you may slightly rock back as you do this, which is fine), and notice if this shifts the weight distribution of the pose from being concentrated primarily in the upper body to being more distributed through the entire body.
Engage the glutes, and push firmly through the hands and toes, so you feel a pull of energy moving out through the back of the body, as the muscles at the front firm up.
Tabletop Plank
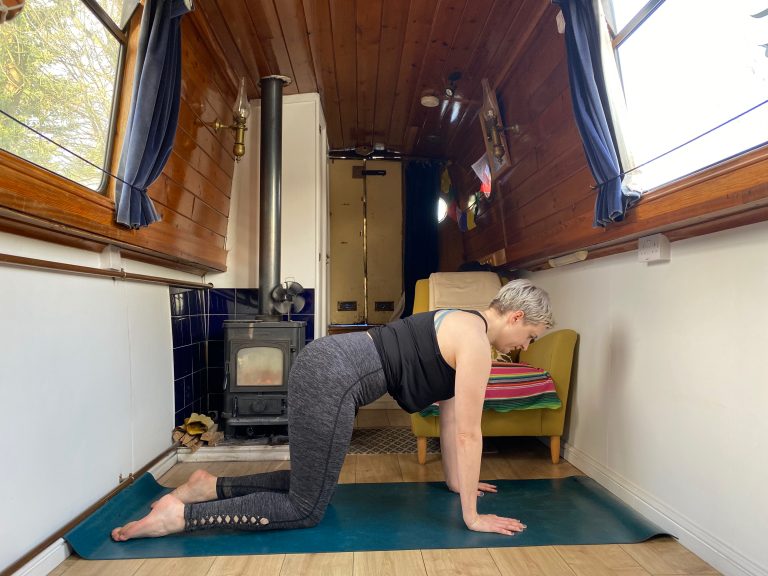
- Come to an all-fours position. Although it is possible to use gentler muscle engagement in this pose, recreate all the steps above to mobilise the shoulders, support the joints and lower back, and strengthen the core and glutes. By recreating the key dynamics of plank pose in a safer, more supported position, you are helping to establish muscle memory.
On your Knees
- Set up your tabletop position, as above.
- Keeping your upper body and core engaged, shuffle the knees back so they are no longer stacked underneath the hips. The further back you take the knees, the more muscle engagement you require, so start with a few cm and increase the distance if you feel ready.
- Notice your weight distribution; if you feel you are relying primarily on your shoulders and hands for support, slightly shift your weight back into your shins to minimise the strain on your wrists and shoulders.
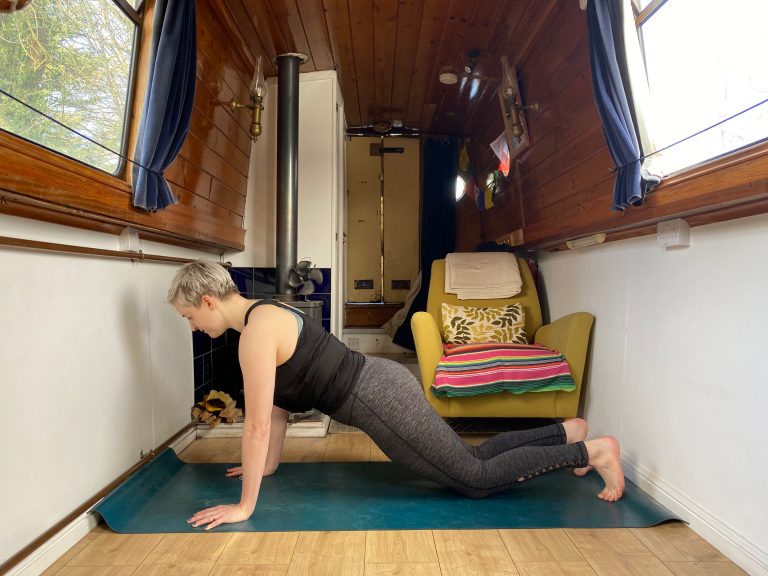
High Plank Pose
- From the plank variation on your knees, extend your right leg back behind you, either inline or wider than your hip and push firmly into your toes. Pushing into your toes will help engage the front of the thigh.
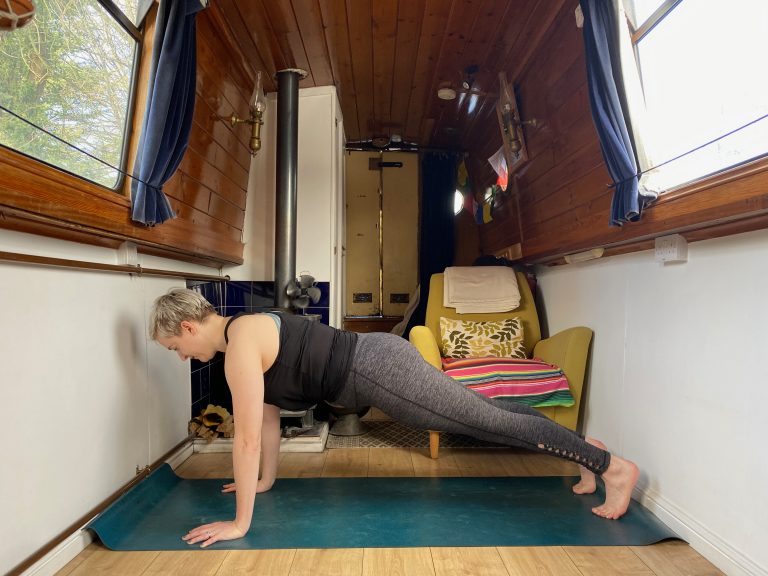
- Do the same with the left leg, so you are in a plank position.
- Scan through your body to check in with the key dynamics making sure your core, lower back, and joints feel firm and supported, and that your weight is evenly distributed and not wholly concentrated in the upper body. The wrists will bear a lot of weight in this pose, but they can be supported by engaging the glutes and legs.
- Notice which aspect of this pose feels particularly challenging, such as keeping the elbows soft, shoulders protracted into the back, or core engaged, and then work on this aspect in one of the previous variations.
When Do I Practice Plank Pose?
Plank pose is a strong and dynamic pose, and, therefore, it suits more dynamic practice styles. You could arrange your practice to work on mobilising and engaging the key areas of the body to help support you as your work towards a plank pose. Or, you could use plank pose to help support other strong poses later in your practice. Whatever way you choose to structure your practice, try not to rush through plank pose and spend some time exploring the key engagement points — particularly the ones you notice as more challenging for you.
When Shouldn’t I Practice or Teach it?
Please don’t underestimate how much goes into practising a plank pose comfortably! Try not to rush to the full pose before exploring some of the other variations.
If you are in the early stages of a shoulder, wrist, or lower back injury, plank pose may not be appropriate. Once your healthcare provider gives you the green light, the wall or tabletop variation is one way you can start building up strength and stability as you return to practice. You can also practice plank on your forearms to reduce the strain on your wrists. Make sure you push firmly into your forearms to support the shoulder joint.
Less is more when it comes to plank pose, although, unfortunately, its prevalence in yoga makes it easy to overlook that! Earlier styles of vinyasa flow yoga have drawn heavily from the Ashtanga primary series and its 60 odd vinyasas (and therefore 60 plank poses). However, this puts an unnecessary amount of strain on the body, leading to injuries that result from fatigue. A dynamic practice with five vinyasas is more than enough for most people! Spend some time slowing this group of movements down to benefit from them. Or only practice a couple of plank poses held for longer periods, and switch out your other vinyasas for cat-cows or skip them entirely.
How Do I Adapt Plank Pose To Make it Accessible? What Are Some Common Difficulties?
- It’s often said that plank pose will help you build strength through the wrists, shoulders and core. However, plank (and chaturanga) may also induce injury in the wrists, shoulders, and lower back. Make sure you or your students have explored the key dynamics of the pose to help build a solid foundation, and remind your students of variations.
- Wrist mobility exercises, like circling the wrists, can help build the necessary strength and flexibility to support poses where you bear weight on your hands. However, if your wrists are constantly hurting from yoga, taking respite from plank and downward dog for a couple of weeks is often the best course of action.
- Be aware of hypermobility. Students with hypermobile joints are required to work much harder in plank pose than other people to keep the elbows soft, and it may be almost impossible for them to practice the floor variation. If you or your students have hypermobile joints, focus on building strength around the shoulders, triceps, and biceps first. A strong core and pushing weight back into the legs can also help.
- Body shape and weight distribution often affects the ease and safety of this pose. If your muscle mass is dense in your upper body around the shoulders and chest, plank pose is generally safe as the vulnerable shoulder joint is more protected and supported. If you have broader hips and thighs, this pose is challenging as the more narrow the upper body in relation to the lower body, the more weight ends up being carried by vulnerable shoulder and wrists joints.
- If you have broader shoulders and narrow hips (what we might think of as a “masculine” presenting physique), have more upper body strength, or a more petite body, you may have more ease in this pose. If you are a teacher, please bear in mind your own physique and that of your students to ensure you teach variations of plank that are available to everyone.
- Even if high plank is part of your practice, you don’t need to take the same variation every time. A good strategy for injury prevention is taking different variations throughout your practice.
- The protraction of the shoulder blades into the back is challenging for many people, and you may notice that your shoulder blades prefer to ‘wing’ off the back. Spend some time in a tabletop variation and focus on firmly pressing into the hands to help stabilise the shoulder joint. Exercises where you retract and then protract the shoulder blades can help build physical and mental awareness of the shoulder position in plank.
- Bear in mind how somebody with a physique that suits plank pose may have to work less hard in high plank, than somebody else in a tabletop or knees down variation. Emphasise how the pose feels, as opposed to how it looks.
How Do I Teach Plank Pose To A Mixed Ability Class?
- Teach the dynamics, not the pose. Explain the intentions of the pose to your students and how the dynamics are experienced in different plank pose variations. Encourage your students to tweak and explore the variations, so they become familiar with ones that work for them.
- Teach different variations. Try not to teach high plank as the goal and the other variations as secondary variations. Focusing on how the dynamics of the pose can be intensified for those who want a stronger practice or softened for those who want a gentler practice is a good approach. Make sure all your students, regardless of their ability, have a stronger and gentler alternative. Skipping all plank variations is a perfectly acceptable way of practising plank.
- Encourage your students to become aware of how their body is naturally suited or unsuited to plank pose. Different yoga poses favour different bodies. Demonstrating this to your students can help empower them to pick poses that work for them, not their neighbour or someone they follow on Instagram. One helpful way to do this is sharing with your students why a particular pose works well, or doesn’t suit, your body. Modelling this for your students can be helpful and empowering as your students grow more knowledge about their own bodies and practice.
- Treat plank as a pose. Plank is a pose, not just a precursor to chaturanga.
- Quality Not Quantity. It’s very easy to overdo plank pose (and vinyasas in general) in yoga. Doing three planks and vinyasas with proper muscle engagement is safer and as challenging as doing ten.
- Demonstrate different variations. If you are demonstrating as you teach, choose different plank pose variations, such as tabletop, or skip it completely in some of the vinyasas — students are likely to follow their teacher’s lead, and if you always take plank pose they often will too.
- Trust in your student’s choices. Empowering your students with knowledge about their own bodies, teaching embodied alignment cues, and giving adequate choice is everything you need to do. The variations and amount of times your students’ choose to practice a pose is their free will.
We would love to hear how you are going with your own plank pose! Let us know if you tried out any of the variations and if you learned anything unexpected about your own plank.
Pin for later

1 thought on “How to: Plank Pose”
Pingback: Trauma and Yoga Series Part 1: Why Agency is Everything in Trauma-Informed Spaces – Nourish Yoga Training