This is part of Nourish’s Yoga Practise Guide Library. We were inspired to make these guides to support your own yoga practise and as a resource for teachers who want to make their classes more accessible. We were also pretty tired of all the generic teaching instructions and guides floating around the internet that aren’t inclusive, accessible or adaptable in any way.
If you would like more guidance on making this practice accessible, we have missed something, or you have any questions drop us a comment –– we love hearing from you and really do mean it when we say yoga is for everybody!
Jump to:
Legs-Up-The-Wall Instructions And Variations
When Do I Practise Legs-Up-The-Wall?
How Do I Adapt Legs-Up-The-Wall To Make It Accessible and Common Difficulties
How Do I Teach Legs-Up-The-Wall To A Mixed Ability Class?
What is Legs-Up-The-Wall?
The name says it all! Legs-Up-the-Wall is a gentle inversion, where the torso remains in a supine position on the floor and the legs are elevated, usually supported against a wall. It is a variation of the asana Viparita Karani (Viparita = inverted; Karani = action), which can be practised with or without a wall or other props.
Legs-Up-the-Wall is a gentle, restorative, and largely safe inversion (difficulties and considerations are discussed below). It’s a great pose to do with lots of props, but they certainly aren’t essential. It can be practised with or without a yoga mat and is lovely to do as part of a Bed Yoga practice.
A quick note on the “scientific” benefits of inversions…
The yoga world makes many claims about the benefits and physiological effects of asana, especially inversion poses. However, a majority of these claims have little scientific validity behind them or are even medically contradictory.
In a recent study (2020) considering some of the physiological effects of inversions in yoga, which also included a brief review of previous studies on inversions, the authors frequently stressed that different trials (and therefore different yoga practitioners) showed conflicting physiological changes and effects.
In the results section, the comparison tables of physiological measurements recorded during various asana showed participants to have lower heart rates in Viparita Karani than any other recorded asana, including Savasana. A lower heart rate is generally associated with being in a parasympathetic state, indicating restfulness and low stress.
So no, practising inversions probably won’t make you younger or more virile, they may or may not affect your digestive system, but chances are restorative inversions, such as Legs-Up-the-Wall, will make you feel pretty chilled out once you find the variation that works for you.
Legs-Up-The-Wall Instructions
You don’t need a yoga mat to do this pose, although feel free to use one. If you like firm surfaces, you can do it straight on the floor or for something softer fold a blanket underneath you. You can also practice the pose in bed.
There are lots of different variations you can do once you have got into the pose. If you enjoy having your legs up the wall, you can make a whole sequence incorporating the variations.
You can stay in the pose as long or as little as you like.
Setting up and Getting into the Pose:
Undoubtedly the most complicated part of this pose is getting into it –– it’s pretty fun once you get the knack of it, but a little daunting if you are new to the pose. If you prefer not to use a wall at all, then jump to Variation 5.
- Grab your props and put them close to the wall, so they are one hand once you are in the pose.
Optional prop list:
– a bolster, pillows, or cushions to go under the hips
– bricks to go under the hips if you prefer firmer surfaces.
– an eye bag
– blankets to lie on or place over you
– a light weight (such as a yoga brick, book, eye bag or soft toy) to place on the belly
– sandbags to place on the forearms
- Start by sitting perpendicular to your wall of choice, legs extended in front of you. If you are confident getting into the pose sit a few inches away from the wall. If you are uncertain about the pose sit up to a foot away from the wall –– you can always scooch in closer once you are in the pose, or remain slightly further from the wall (the benefits of remaining further from the wall are discussed in How Do I Adapt Legs-Up-The-Wall)
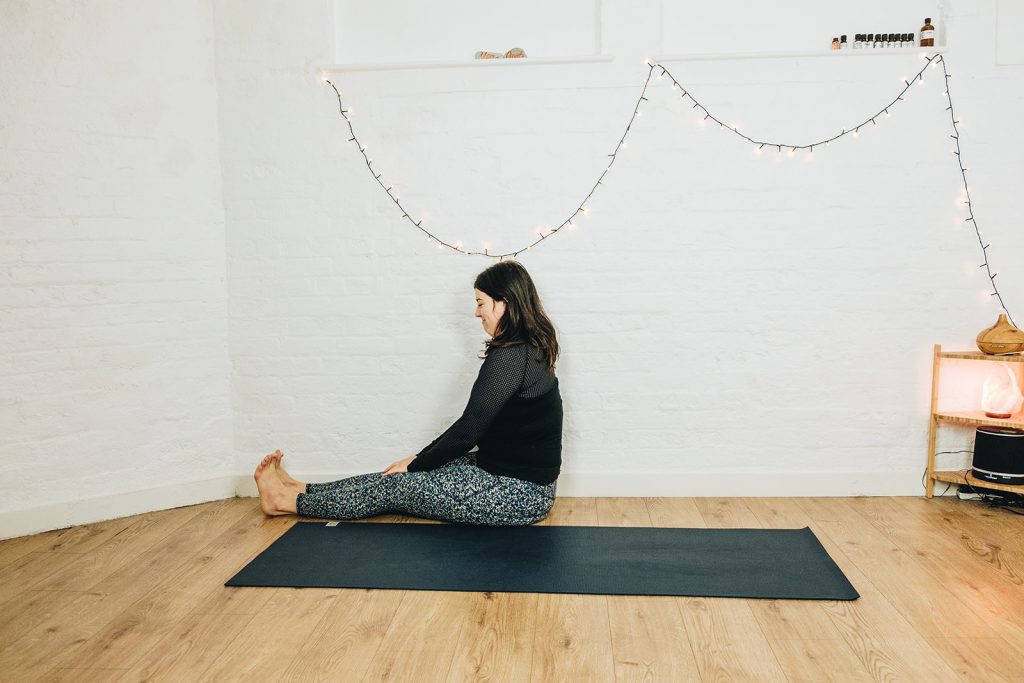
- Lower your torso either partway down, supporting yourself on your bottom forearm. Or come all the way down to the floor, so you are lying on your side, arms extended in front of you.
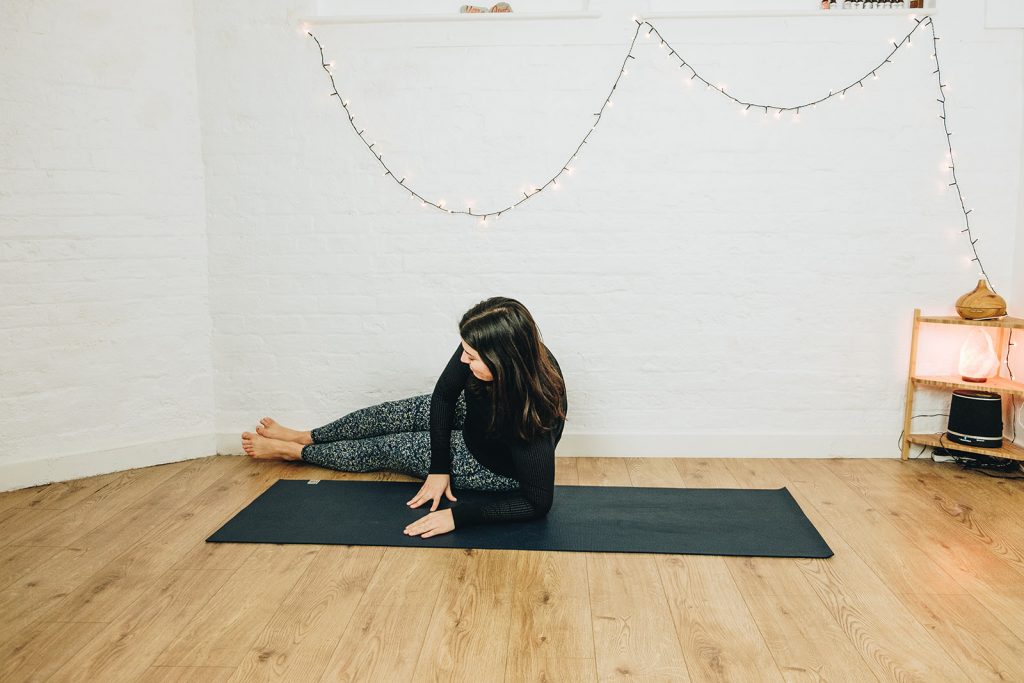
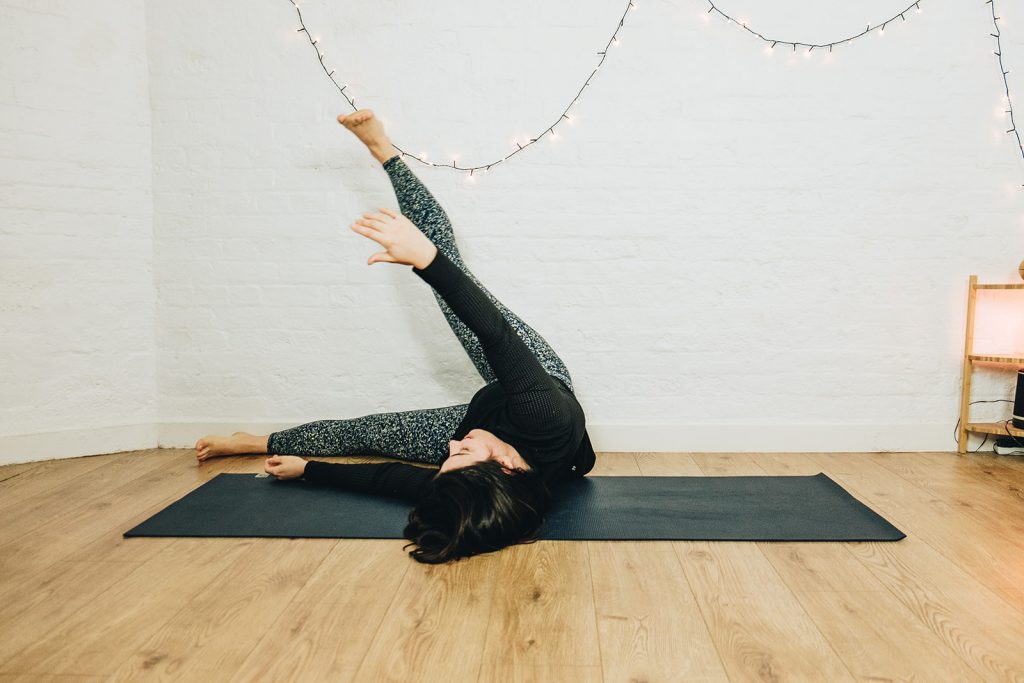
- If you are resting on your forearm, start to lift your top leg up so it rests on the wall. Let your torso roll so you face the wall with your body and lean back onto your other forearm for support. Lift the bottom leg to join the top. Keep lifting the legs until they are straight up the wall, with your torso facing your legs. Slide your arms out to the side to lower your torso down to the floor.
If you are lying on your side, arms and legs extended in front of you, lift your top arms and swing your top leg up the wall. Use this rolling momentum to lift the bottom leg up the wall too.
- Make adjustments: you might want to scooch closer or further away from the wall and add in your props. Sliding a bolster or blocks under your hips makes the inversion aspect a little deeper, which may or may not be appropriate for you or your students.
Getting Out of the Pose
To get out of the pose you can either reverse the way you came in, by dropping the legs to one side and rolling out of it until you are lying on your side. You can also push your feet against the wall and slide backwards so you are further away from the wall. You can either push back until your whole body is flat on the ground, or roll over to one side when you are a couple of feet away from the wall.
Variation 1: Legs Straight Up
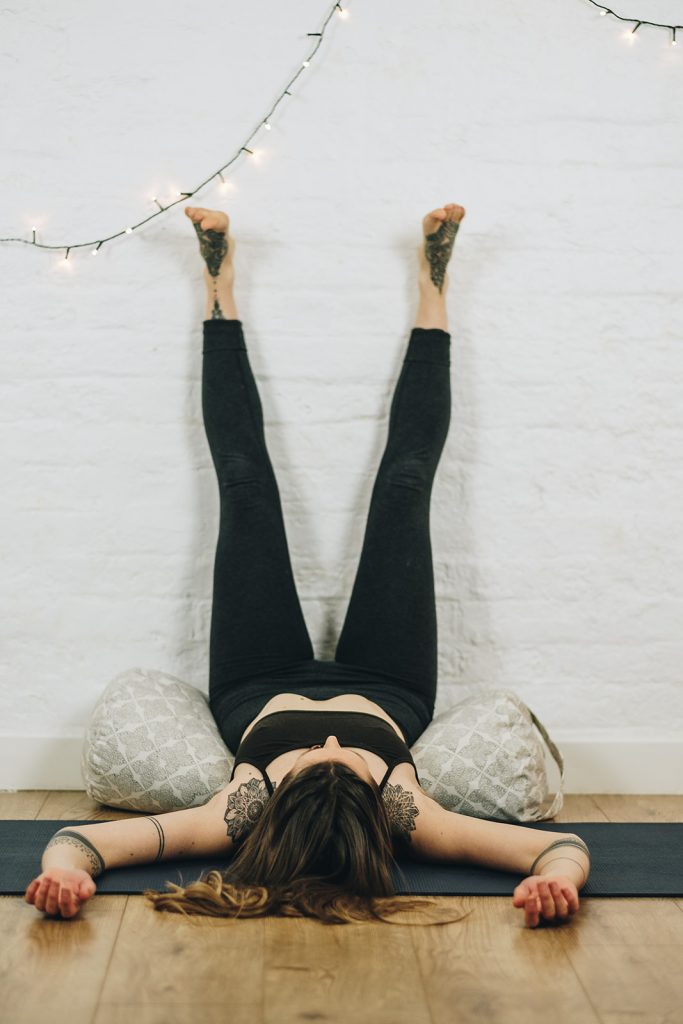
This is the most traditional variation, where the legs rest straight up the wall. The legs can be any comfortable width that feels natural for your body. If it feels comfortable for you and makes sense for your body, see if you can let the head of your thigh bones drop deeper into the sockets of the pelvis.
Your toes may naturally point forward, or, if it is more natural for your hips to rotate outward or inwards let them do so and your legs and feet will turn out or in respectively.
Your arms can rest anywhere that feels comfortable, this might be in a cactus position (pictured) which opens gently through the chest and shoulders, resting on the belly which can help you connect to the breath, or palms up or down at your sides.
Variation 2: Wide-Legged
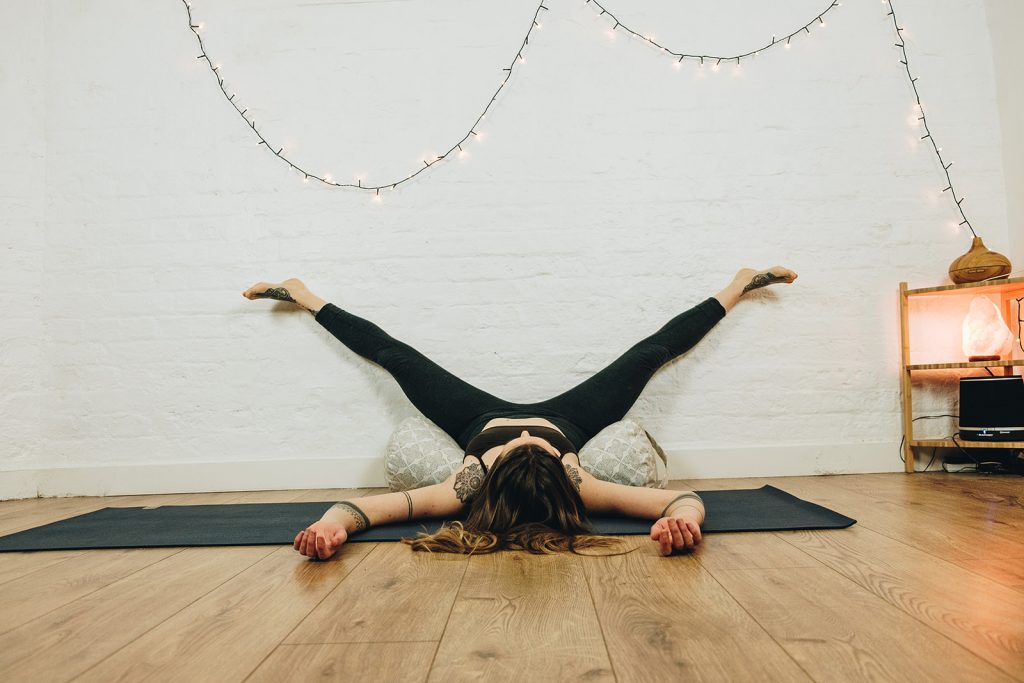
From Variation 1, let your legs drop out to the sides in a straddle position. You may feel the stretch intensify somewhere in the legs (hamstrings, groins and inner thighs, outer thighs).
The effect of gravity naturally drawing your legs down can feel wonderful for some people, and uncomfortably intense for other people. You can keep your legs in a smaller V shape by engaging the legs, or let them drop wider depending on what is comfortable.
This is a great accessible variation for Wide-Legged Forward Fold (Upavistha Konasana) if you or your students find forward folds challenging, as this variation takes away the need to tilt the pelvis forward.
Variation 3: Butterfly Legs
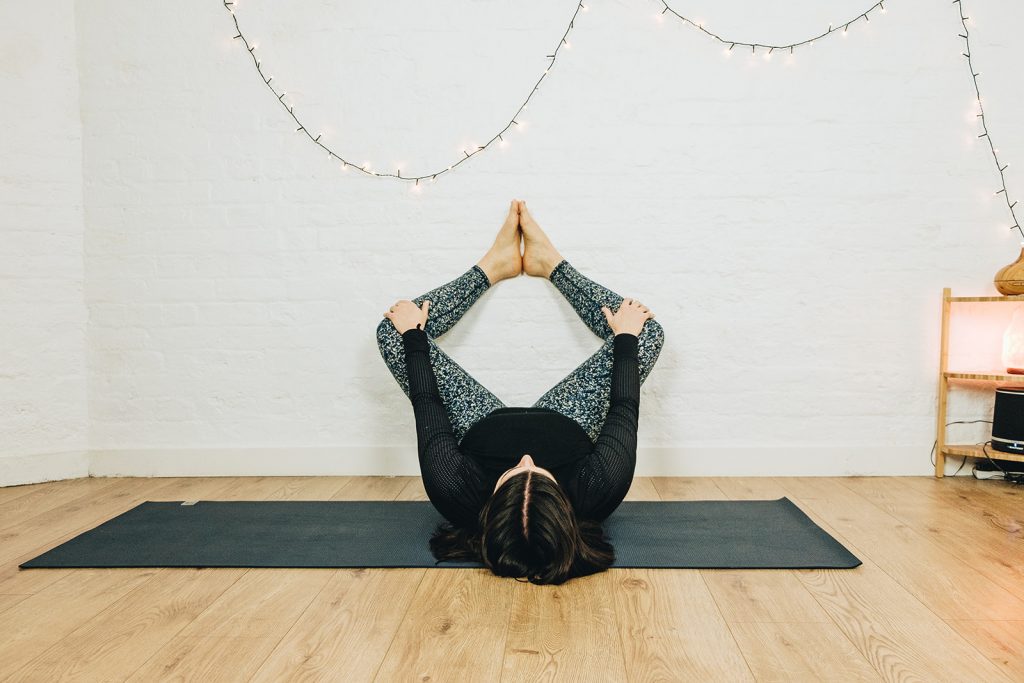
From Variation 1, bring the soles of the feet together and let the knees drop out to the side. Slide your feet down the wall coming into a diamond shape with the legs. The legs can be in a loose diamond shape, or you can bring the feet closer into the groins.
You can also push gently on the inner thighs to intensify the hip and groin stretch.
Variation 4: Figure-Four
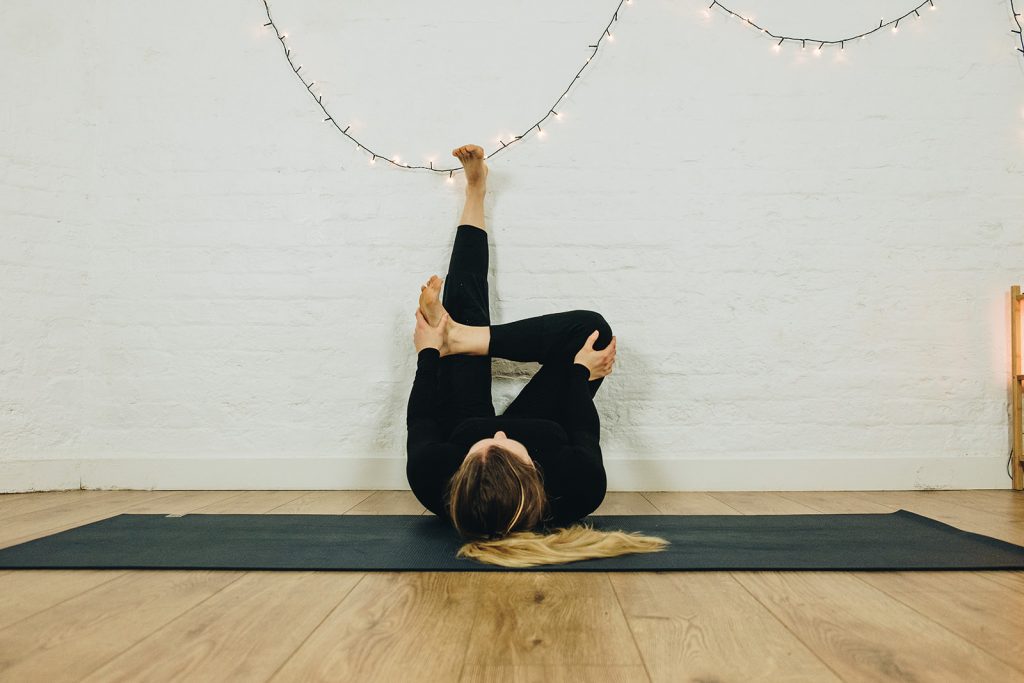
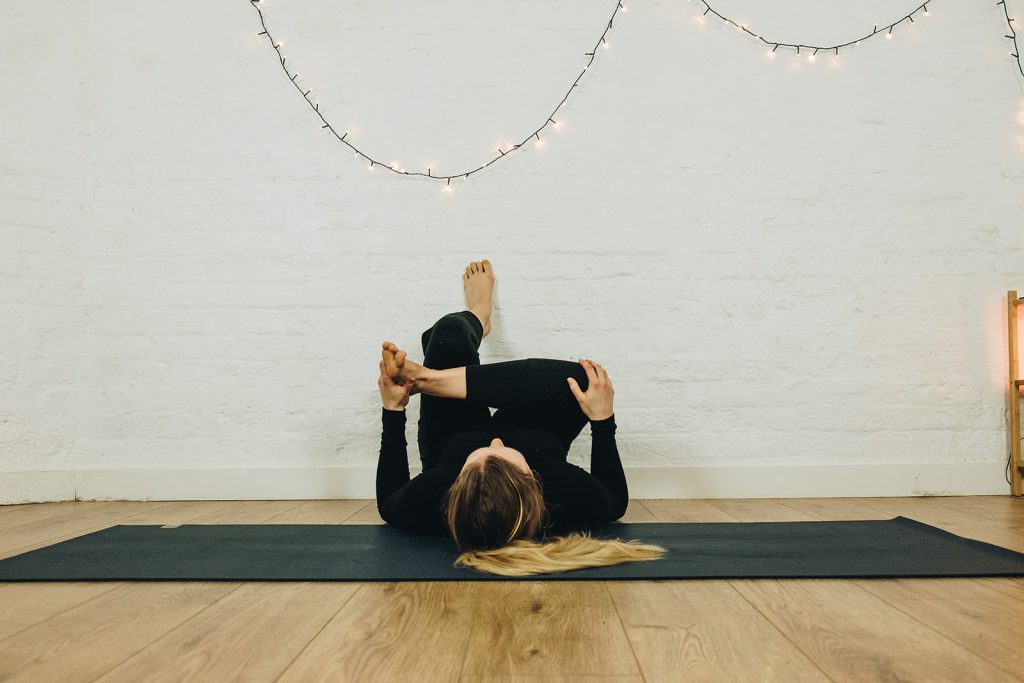
From Variation 1, keep one leg extended straight and bring the other into a figure four shape, by bending the knee, opening the hip, and resting the ankle on the extended leg either somewhere on the shin or thigh (anywhere but the knee!), to create a hip opener. If you have any knee issues, flex the foot of the figure-four leg. Repeat on the other side.
For the second version, from Variation 1 if you are very close to the wall shuffle away from it about a foot. Bend one leg and place the sole of your foot on the wall –– you may need to move further away or come closer into the wall depending on the length of your shins. Come into a figure four shape with the other leg, resting the ankle on the thigh. Repeat on the other side.
Variation 5: No Wall
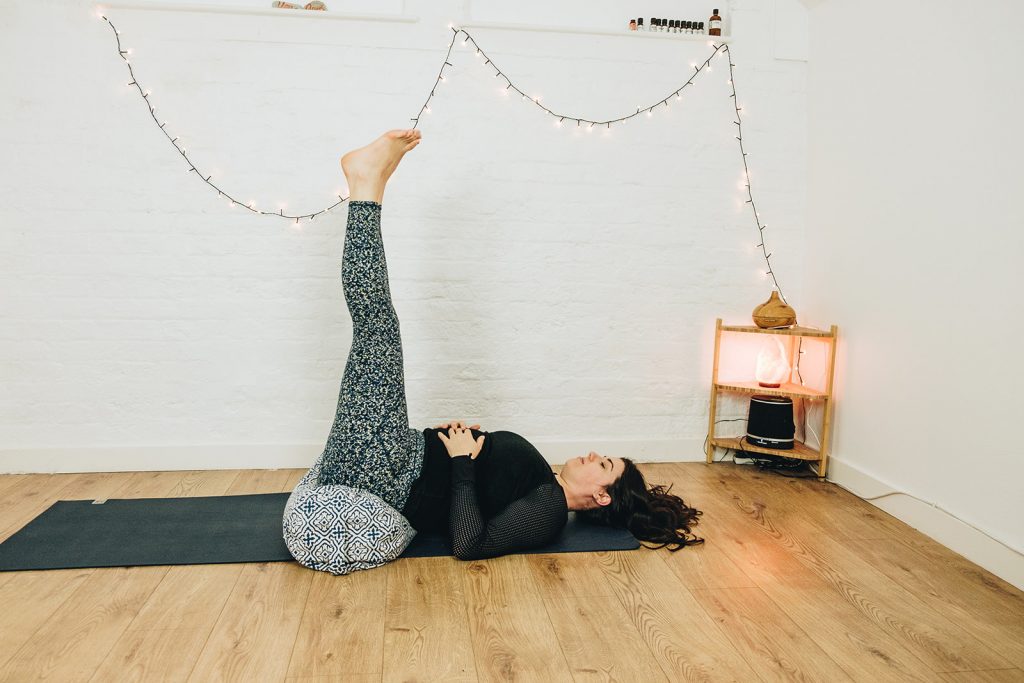
This is ideal if you are limited in either wall space or time as it is super quick to get in and out of. It is generally more challenging to hold this variation for longer periods.
Lie on your back, draw your knees towards your chest and extend the legs straight up! If you want to do this with a support under your hips, slide it into place when you are lying on your back and before you draw your knees in –– this is usually easier then putting them in place once you have raised the legs.
Variation 6: Chair
This is a great variation if you have limited mobility and find it hard to lie down or stand back up without support as you can use the chair to help you. It’s also a good alternative if your legs go numb very quickly in Variation 1, as the feet aren’t elevated above the knee.
I also recommend this variation to everybody because it is just very very very nice.
Set your chair up by placing it at the bottom of your yoga mat/blanket/floor space. If you have a chair with a gap underneath the backrest (so your feet can poke through the chair if they need to) place the chair so it faces the mat straight on. If your chair has a closed backrest then turn it sideways so your legs can extend across the seat of the chair.
Feel free to add a cushion or folded blanket to the seat of the chair for extra comfort. If you are doing this at home, it is nice to do with a squishy armchair or sofa.
Lie down with your knees bent and feet flat on the floor a few inches in front of the chair. Place one calf on the seat of the chair, and then the other one. Relax!
When Do I Practise Legs-Up-The-Wall?
Whenever (and pretty much wherever, practise Variation 5 if you don’t have a wall nearby)!
Legs-Up-the-Wall is a great stand-alone pose, as it doesn’t require any warming up. You can practise it at any time of day, and if you work from home, or have a space where you feel comfortable relaxing at your place of work, it’s an excellent pose to use as a little R-and-R break in the middle of the day. You can also do it towards the end of the day, or right before bed (and even in bed), if you are struggling to wind down.
It’s a wonderful pose as part of a Restorative or Yin yoga sequence. Although it can be practised at any point in the sequence, from a logistics standpoint, it’s usually easiest at the start or towards the end of a sequence so you don’t need to keep moving your mat around, unless you are practising by a wall anyway!
It’s a nice pose to use before savasana in more dynamic styles of yoga.
When Shouldn’t I Practice or Teach it?
Best to avoid it in the middle of a dynamic flow due to its restorative nature.
If you or your students have any cardiovascular conditions, blood pressure issues, or glaucoma, check that your student has verified practising inversions (even gentle inversions) with their doctor.
Sometimes when we are very stressed or anxious, poses that require stillness, even if they are supposed to be relaxing, can increase anxiety. As with all yoga poses, if the pose doesn’t work for you –– either at that moment or in general –– then don’t practise it. As a teacher, it is your responsibility to share this advice with your students too. You may recommend a different variation of the pose, or encourage them to pick any other restorative pose. The main intention and benefit of this pose are its relaxation effect, and therefore any pose that feels safe and comfortable for your student is preferable.
How Do I Adapt Legs-Up-The-Wall To Make it Accessible? What Are Some Common Difficulties?
- The most commonly experienced difficulty with legs up the wall is getting into and out of the pose. It may take a few attempts. If you start further away from the wall, this also makes it easier.
- Numbness in the toes and legs is a fairly common complaint and becomes more likely the longer you are in the pose. Some people experience numbness but aren’t fussed by it, however, it is very uncomfortable for many people. Moving the torso further away from the wall, so the legs aren’t elevated straight up or Variation 6 (with the chair), may prevent or reduce numbness. Otherwise, come out of the pose when your body indicates to you that it is time. The restorative benefits are less likely to be experienced if you are uncomfortable in a pose.
- Students with bigger bodies and people with large breasts may feel compressed and restricted when the legs and body are at a 90-degree angle and/or when the hips are elevated. Removing props from under the hips, and moving the torso further from the wall (creating an angle greater than 90-degrees) can help reduce compression.
- For students with restricted mobility, getting in and out of supine poses can be challenging and anxiety-inducing. Using a chair provides physical support when it comes to standing or sitting up again. Not all students feel comfortable practising supine poses, which is fine.
- Use of props might complicate the pose, as opposed to making it easier. Props are optional.
How Do I Teach Legs-Up-The-Wall To A Mixed Ability Class?
- Outline the intention of the pose as a restorative pose. Once students are aware that they are aiming for maximum comfort, as opposed to legs elevated at 90-degrees, they are more willing to modify.
- Demonstrate getting into and out of the pose. Reassure them it is not about elegance!
- Give different options with distance from the wall, props and set-up. Emphasise the pose is about comfort and rest, and therefore there is no best way to practise the pose, it’s about finding the right set up for you.
- Acknowledge that numbness is a common experience, provide your students with variations to minimise numbness as well as the option to come out of the pose when they feel ready.
- Tell your students how long you plan to be in the pose if it is more than one minute/six breaths. Emphasise they can come out when they feel ready.
If you are teaching Variation 6 to a group with limited mobility or in a Chair Yoga class, demonstrate getting into and out of the pose first. State that it is the student’s choice whether they want to lie down on the floor, and have alternative restorative poses that can be done whilst remaining seated in the chair.
Pin for later:
6 thoughts on “How to: Legs Up The Wall”
Really Appreciate this update, how can I make is so that I receive an alert email every time there is a new update? Danette Sim Aney
Hey Danette,
I’m afraid we don’t have alerts saved for blog updates, but if you sign up to our mailing list, we do talk about all that’s new for Nourish Yoga on a pretty regular basis (including blog posts, of course!)
All best wishes,
The Nourish Team
Nice read, I just passed this onto a friend who was doing some research on that. And he just bought me lunch because I found it for him smile So let me rephrase that: Thanks for lunch! Marylee Bryanty Phox
Ah! So glad to hear that this has helped your friend – and got you lunch!
All best wishes,
The Nourish Team
Pingback: Yoga Self-Practice for Summer – Nourish Yoga Training
It is truly an incredible article. I follow this blog constantly. I find the most accurate information here.
Comments are closed.